
Free and Batch Data Collector share much of the advanced interface. Understanding the key areas will greatly impact your results when using the software. Below we’ve enumerated the main elements:
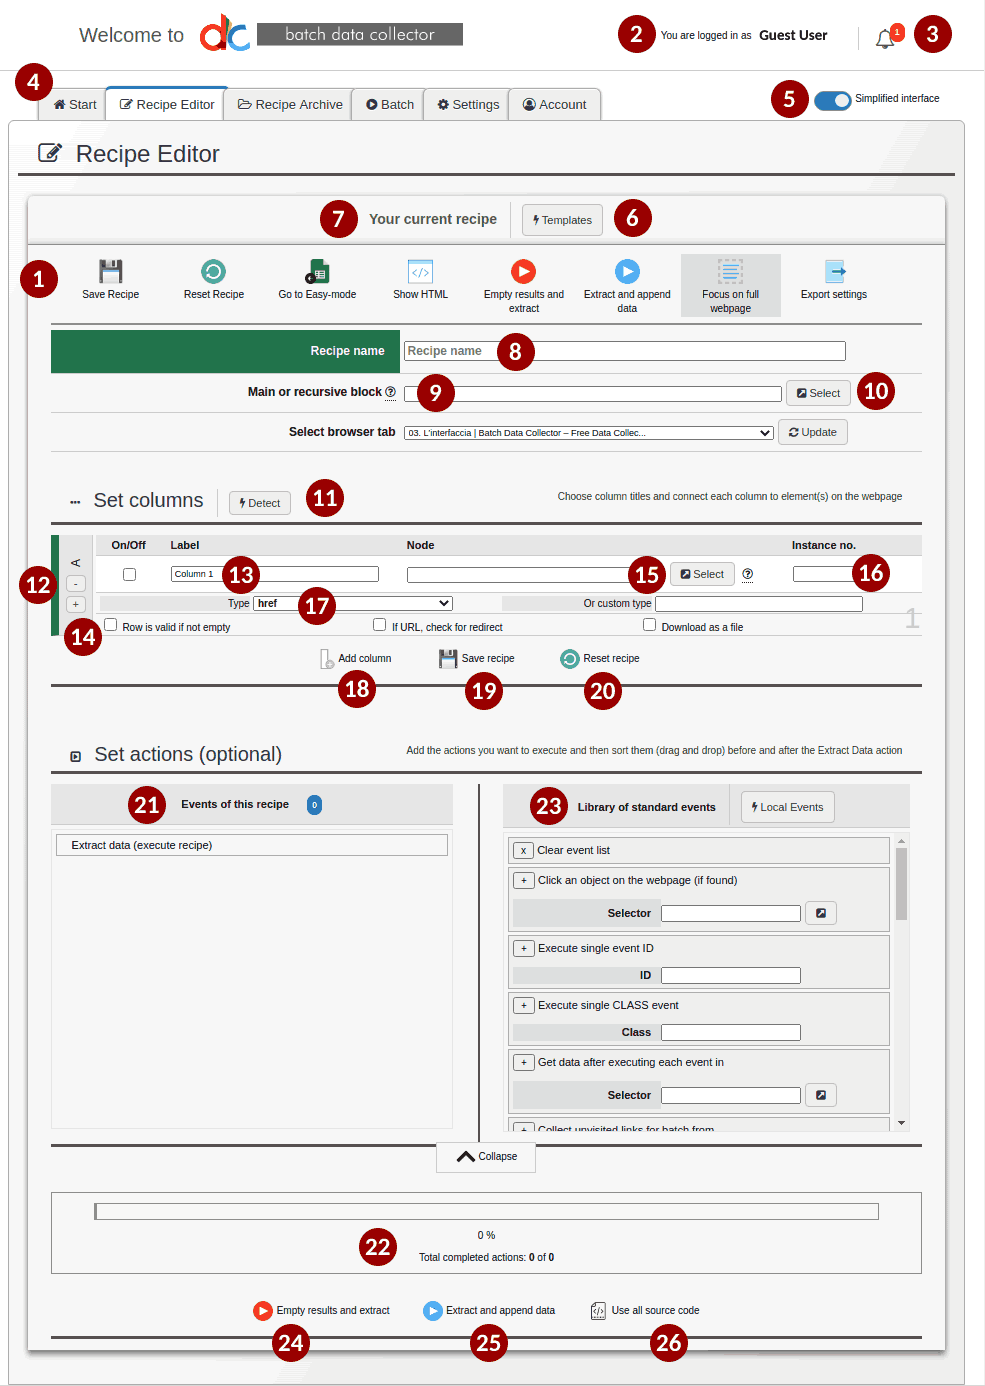
- Dedicated ribbon menu: some functions are shared with the Excel Like interface, such as Save Recipe, Reset Recipe and Empty results and extract.
- Username: Shows the name of the user who is logged in. Different users can have different privileges, and therefore different views with varying functions. For example, a certain type of user profile may include access to the Batch area, while another may not.
- Notifications: Shows relevant information that each user should review, such as the availability of new versions, updated features, or planned/unplanned system maintenance.
- Function Tabs: Start, Recipe Editor, Recipe Archive, Batch, Settings, Account.
- Simplified Interface: Shows or hides certain options (recommended for more advanced users).
- Templates: Loads the template panel. The available templates are grouped by type according to a tree structure.
- This section is dedicated to the creation or application of a recipe. For starters — and we’ll expand on this quite a bit more later — think of a recipe as 1) a set of fields to be extracted from a web page, and 2) key actions to be performed during the extraction process.
- Recipe Name is a mandatory field, and will allow you to indentify and retrieve previously-generated instructions once saved to your Recipe Archive (a premium Batch Data Collector feature).
- The Main or Recursive Block is the parent element that contains all child elements of interest for data extraction. For example, when extracting a table, the parent block is the tag table (where the child elements will be the subordinate td). If the repetitive element is not known, or you simply don’t know what to put, we recommend you use the keyword aggressiveScraping, which is typically capable of identifying the parent element on its own.
- Select: Activates an interactive interface (Inspector) on the underlying webpage, which has been specifically designed to help you identify and select elements to utilize in your Recipe.
- Column Definition Area: This section is dedicated to the end-game file you’ll download upon completion of all scraping operations, likely an Excel. Here you’ll work to define which columns are ultimately included in the final export, and what information will be populated in each. As in Excel, the collection of all columns for each single row, to us, constitutes a record. It is just how much you need to draw in this area to perform an extraction. There is currently no limit to the number of columns that you can create for each record.
- Single column options: columns can be reordered vertically, by drag and drop. New columns can be added between two pre-existing ones or deleted using the “+” and “-” buttons of the header.
- Label: Names the single column header.
- Basic Validation Filters: If column data contains essential information, you can verify data capture and invalidate a line in the event it is null. If the column data contains a link that ultimately redirects you to a different webpage, Batch Data Collector can follow the link to capture the resulting URL (Batch Data Collector only).
- Node & Select: In the Node field you’ll need to specify a selector, in CSS format, that will serve to capture the portion of the underlying code you’re interested in retrieving from each webpage. You type this in, or you can use the integrated Select button exactly as described in #10.
- Instance Number aka Instance No.: If the Node selected in #15 does not correspond to a single element, but rather a group of elements, you can use this feature to choose which specific instance to isolate. Additionally, if the selected Node points to a table, and therefore to a set of sub-columns (td), you can identify the first element of the table by setting the occurrence to 0, the second with occurrence 1, and so on.
- Type: Many html tags provide attributes. In future knowledgebase articles we’ll better explain the basic concepts of this language, along with CSS selectors. It is crucial, however, to know that some attributes are considered “standard,” meaning you can capture their values by simply choosing one from our drop-down Type selector. If our preset attributes aren’t sufficient, you can specify a custom type in the text cell just below. Note that specifying a custom value supercedes any selection made via the drop-down Type selector.
- Add Column: Adds a new column to your Recipe, with the subsequent additional fields to be filled out on-screen. The column counter is fixed, where each new column is generated is added to the end/bottom.
- Reset Recipe: Careful! This resets all Recipe settings. Any unsaved data will be lost.
- Save Recipe: Saves all settings defined on this screen in your personal Recipe Archive, assigning them the identification name set in #8. This function is only available in Batch Data Collector and only for some types of subscription.
- Recipes can be paired with Events, which are complex actions that Free and Batch Data Collector can perform on the webpage before, after, or during source code analysis. Events can be drag-and-dropped inside the Events of This Recipe area to reorder your execution priorities.
- The Progress Bar tracks execution times of your recipe, highlighting the status of queued actions.
- The Library of Standard Events is a collection of predefined actions that can be added to the Events of This Recipe area. The actions available differ depending on the version of the software used, where the most sophisticated are for Batch Data Collector subscriptions. You can add Events by clicking the plus (“+”) button to the left of the Event name. Similarly, any added Events can be removed by using clicking the minus (“-“) button. Clear Event List, as you can imagine, will zero out all current Events and configurations.
- Empty Results and Extract: This checks your Recipe for errors, removing any data collected thus far from the central memory, and proceeds with a net-new extraction. If the extraction is successful, links to download the output files will appear for Excel, CSV and JSON formats. If your Recipe contains errors, each field requiring a revision will be identified on-screen.
- Extract and Append Data: This feature performs the same operations outlined in #24 without emptying the temporary memory of data previously collected. This can be useful for semi-manual processing. Consider, for example, browsing through a website to choose the webpages you wish to extract one-by-one. Free Data Collector, which does not include any Batch functions, would append your results to previous page extractions, page after page, using the same user-defined Recipe. This would result in a single file with one row per record to be exported, rather than countless disparate files to be manually superimposed.
- Use all Source Code: Captures all underlying source code from the webpage before applying the Recipe according to the methods described in points 24 or 25. We chose to place this button here (at the bottom, next to the extraction buttons) to speed up the steps in 24/25. Thus, for each page you visit while browsing, you’d ideally click Use All Source Code followed by Extract and Append Data.
Ok, let’s catch our breath!
We know there’s a lot to learn. After a bit of practice, though, Recipes can become generally quite simple to write, where you’ll likely have a few “go-to” operations that you rely heavily on. And if you stick with it, you’ll eventually have a trusted tool to help you automate a ton of repetitive actions with a handful of clicks.